There are several ways to melt copper, and depending on the application, it can be melted differently. This article, How to Melt Copper, discusses various ways to melt copper, including detailed steps and uses. If you are wondering what copper melting method suits a particular application, read on for more information.
Melting Copper on a Stove
Melting copper on a stove is one of the most common ways to melt copper. This straightforward copper melting method is typically used for casting, joining, and recycling.
Let’s examine the melting process step-by-step.
Applications
Copper is melted on a stove for various applications. A few everyday purposes are mentioned below.
- Casting for Small Projects. Copper is molten on the stove and then cast into a desired shape. Commonly artists melt copper to cast it into a sculpture or jewelry design.
- Joining. Joining is a similar process where copper is molten on a stove. Individuals use this method to braze and solder copper pipes.
- Recycling. Copper is a recyclable metal. People melt copper wires, scrap, and waste materials on a stove to recycle the metal.
Advantages
- Easy Accessibility. Since stoves are easily accessible on the market, you don’t need a big set-up to melt copper. Moreover, melting copper on the stove can be performed at home or in a small workshop.
- Easy-to-Use. Melting copper on a stove is convenient, especially if you’re melting a small amount of copper.
- Cost-effective. Melting copper on a stove is affordable compared to using specialized equipment.
Disadvantages
- Capacity Limitations. Melting stoves have a limited capacity for melting copper. If you need to meet significant production demands, melting copper on the stove may not be the ideal solution.
- Inconsistent Results. Melting copper on a stove may not provide consistent results, particularly when melting larger quantities of copper. The heat source may not be evenly distributed, creating an uneven melting effect and potentially affecting the quality of the end product.
- Safety Risks. Melting copper on a stove can be hazardous if proper safety precautions are ignored. Copper can reach high temperatures and release toxic fumes, harming the operator and those nearby.
Safety Precaution
Melting copper on a stove can be unsafe. Therefore, it should be performed by skilled personnel wearing the required gear and following safety precautions. There must also be a fire extinguisher nearby.
Melting Copper with a Torch
Using a torch is another popular way to melt copper for various applications. A melting torch produces a high-temperature flame to melt the copper.
Let’s learn how to melt copper with the torch below.
Applications
- Welding/Joining. Welding and joining are two typical applications that melt copper with a torch. The torch helps weld copper pieces together.
- Artistic Purposes. Artists also melt copper with a torch to form unique art pieces.
- Repairing. Copper melting with a torch is also suitable for minor repairing of copper wires and pipes.
- Jewelry Making. Jewelers also melt copper with a torch for jewelry making. The molten copper is shaped into an intricate design for jewelry pieces like bracelets, earrings, and more.
- Casting. Copper melting with a torch is also done to cast copper into a particular shape and mold.
Advantages
- Fast and Efficient. Using a torch to melt copper is quick and effective. It can melt copper in a matter of minutes. Therefore, it is helpful for situations where time is critical.
- Precise Control. A copper melting torch offers precise control of the melting process. As a result, it makes it easy to work with small or delicate copper pieces. The torch lets you heat precisely where needed. As such, it prevents damage to the surrounding areas.
- Versatile. Besides melting copper, this torch can be used for brazing, welding, and soldering.
- Portable. The copper melting torch is a transportable device. Individuals can carry it with them for fieldwork.
Disadvantages
- Safety Hazards. It can be risky if you do not take enough precautions or know how to handle this melting torch.
- Limited Capacity. The copper melting torch comes with a limited capacity. Therefore, it can melt only a small amount of copper at a time. This makes it unsuitable for industrial use.
Safety Precautions
If not performed carefully, melting can be a dangerous act. Only trained individuals should perform it at a location where there are no flammable objects in the surroundings.
Use tongs to hold the crucible and pour melted copper into a mold. Even if you use gloves, you should not touch the hot crucible. Crucibles can be so hot that it can cause skin burns.
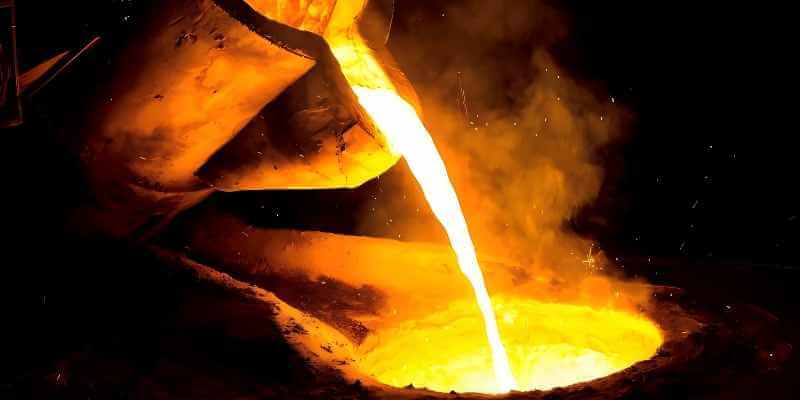
Melting Copper with a Furnace
Copper is also melted in a furnace for industrial applications. Generally, this copper melting process is used to make copper pipes, rods, and castings.
Applications
- Fabrication of Metal. Melting copper in a furnace is common for several copper fabrication processes, including forging, extrusion, casting, and more.
- Production of Wires. Copper is also molten in a furnace for wires, cables, motors, transformers, and printed circuit boards.
- Construction Industry. Melting copper on a furnace is usual practice in the construction industry for applications like plumbing, roofing, etc.
Advantages
- High Purity. Melting copper in a furnace lets you eliminate all impurities. Therefore, you achieve the purest strain of copper possible.
- Melt a Large Amount of Copper. Melting copper in a furnace allows you to melt a large amount of copper with efficiency.
- Versatility. You can melt copper in a furnace to make a wide range of copper-based products, such as copper wires, pipes, alloys, and electrical components.
- Recycling. Melting copper in a furnace is an easy way to recycle copper scrap. Molten copper is reused to make new copper products.
Disadvantages
- Environmental Impact. A copper melting furnace uses high energy and releases air pollutants and greenhouse gas emissions.
- Safety Hazards. If not handled properly, the furnace can pose the risk of fire and burn.
Safety Precautions
Wear a complete protective clothing set, including gloves, face shields, aprons, etc.
Perform it in a well-ventilated area, as copper produces toxic gases and fumes while melting. These can be harmful if inhaled.
Ensure there is no flammable material nearby.
Use tongs to handle the molten copper. You may run the danger of suffering burns and injuries using short-handled tools otherwise.
Be prepared for emergencies. There must be a fire extinguisher around. If possible, get a Class-D extinguisher designed for a fire involving metal especially.
Induction Melting Copper Furnace
Melting copper using induction heating furnace is a fast and efficient method. Experts in the industry prefer to use induction heating since it is a convenient way to melt copper and gives precise temperature control.
Induction heating employs electromagnetic current to heat an electrically conductive metal. The heat generated by the current can melt metal copper.
The process can melt a large amount of copper in a few minutes. Moreover, induction melting is comparatively safe as it produces negligible smoke.
Applications
Induction melting copper is widely used in several industries as it ensures a controlled melting process with negligible material loss. Induction melting furnaces can usually melt copper, brass and copper scrap from 1kg to 5000kg.
Some applications where induction heating is commonly used for melting copper are below.
- Foundries. An induction heating system is regularly used in foundries to melt copper to make castings.
- Manufacturing. Induction heating is also used in various manufacturing processes to melt copper. For instance, copper is molten and formed into wire, tubing, and sheet metal for use in electronics, HVAC systems, and other applications.
- Recycling. Induction heating is a popular method for recycling copper scrap. The process allows scrap copper to be melted down and reused in new products.
- Jewelry Making. Copper induction melting is also commonly applied in copper jewelry design. The copper is liquefied and shaped into intricate designs and patterns to create jewelry pieces.
See induction melting applications.
Induction Melting 50 kg Scrap Copper
Advantages
- Precision Control. One of the primary advantages of induction melting copper is that it allows for precise temperature control. Consequently, it ensures consistent and uniform melting of copper.
- Quick Melting. An induction heating system can melt copper faster than a traditional copper heating system. After all, the heat is generated straight onto the desired location.
- Increased Productivity. Since an induction heating system melts copper with speed and efficiency, it increases the productivity rate.
- Energy Efficient. An induction heating system utilizes low energy to melt copper via electromagnetic induction to project heat directly onto the material.
Disadvantages
- High Equipment Costs. An induction heating system is a specialized equipment that can be expensive to some individuals. Only professionals who melt copper for commercial purposes should buy it.
- Required Skilled Technicians. Since heating copper using the induction method is complex, only skilled professionals should perform it.
Safety Precautions
Melting copper with an induction heating system is generally safe, but the operator must take appropriate safety precautions to ensure 100% safety.
An individual working with an induction heating system must equip a PPE (personal protective equipment) kit that includes a heat-resistant face shield, gloves, and clothing.
Inspection of induction heating machines for safety and proper functioning is crucial.
Melting copper produces a lot of fumes and heat. As a result, the process must be performed in a ventilated area.
Personnel involved in the copper melting process should be aware of emergency protocols. For example, how to shut down the system in an emergency.
Molten copper can cause severe burns if not handled adequately. As such, it is necessary to have material handling equipment at the place.
An induction heating system uses high-voltage electricity, so electrical safety is important too.
Melting Copper at Home
Some people who need to melt a small amount of copper for non-commercial use prefer to melt it at home. Melting copper at home is possible using a small-scale furnace or kiln.
Let’s find out how to melt copper at home.
Applications
Melting copper at home can be dangerous if you are not adequately trained. However, individuals with the required equipment and experience can melt copper at home for the following applications.
- Jewelry Making. Since copper features a unique texture and color, it is used to make jewelry such as bracelets, necklaces, and earrings.
- Making of Copper Sculpture. Some sculptures also melt copper at home to make copper sculptures. They create different artwork by melting copper at home.
- Copper Pipe Repair. Occasionally, copper is also melted for repairing copper pipes and fittings at home. Individuals also melt copper at home to repair a damaged section of electrical wire or customize their lengths.
Advantages
- Low-Cost. Melting copper at home can be cost-effective. You can melt and recycle copper scrap without any huge investment.
- Artistic Pursuits. For artistic purposes, melting copper at home can be a fun and rewarding project. It allows the individual to create art pieces and functional objects.
Disadvantages
- Safety Hazards. If proper safety precautions are not taken, melting copper at home can be dangerous.
- Legal Requirements. There might be a legal requirement for melting copper at home, depending on your country of residence and the amount of copper you wish to dissolve.
Safety Precautions
It is worth emphasizing that only an experienced metal worker should melt copper at home while taking relevant safety precautions.
Wear a long-sleeved shirt and pants made of natural fibers. Avoid synthetic fiber that can catch fire. Also, use gloves, safety glasses, and a face shield.
Use long-handled tools to handle molten metal.
Avoid melting painted copper, as it might release toxic fumes.
Have a fire extinguisher in place.
Choose a ventilated area for the copper melting process.
Factors to Consider When Choosing a Copper Melting Method
Now you know there are several methods to melt copper depending on the scale and purpose. However, a single method can’t fit all situations.
Below are some crucial factors to consider when selecting a copper melting method.
Investment Cost
The investment cost is one of the central factors to consider when selecting a copper melting method. The cost of melting equipment depends on this method.
For example, induction melting is among the most expensive copper melting techniques due to the advanced technology required.
Propane torch melting and furnace melting are comparatively cheaper. It’s best to determine your budget before deciding on your preferred melting choice.
Operating Cost
Apart from the initial set-up cost, you need to determine the operating cost of the melting method. Get an estimate of melting machine maintenance, cost of energy, and copper scrap together with the labor cost.
A copper melting method, such as induction melting, is energy-efficient and requires less maintenance. Although the initial investment is significant, copper melting through induction heating proves to be an affordable option in the long run.
Output Size
The output capacity you are looking for is another important factor to consider. Each copper melting method has a distinct capacity when it comes to output.
If you want to melt a large volume of copper, get an industrial furnace or induction heating system.
Propane torch melting is more suitable if you want to melt copper in small quantities.
Working Environment
When choosing a copper melting method, the user must also consider the working environment.
Methods that produce more fumes or dust need additional safety measures.
For example, a copper melting furnace might produce a lot of smoke and fumes. This type of copper melting must be performed in a ventilated place.
Always choose a safe and appropriate working environment regardless of your preferred copper melting method.
Safety Precautions
Safety is another important factor you can’t ignore when choosing a copper melting method.
Methods like propane torch melting that release open flame can be hazardous. As a result, you must take adequate safety precautions.
If you do not have a workshop with enough safety equipment, look for a copper melting method that is comparatively safe.
These are some of the primary considerations an individual must evaluate when determining how to melt copper.
Conclusion
This article covered the various methods to melt copper. Each comes with its specialties and caters to a specific application. We hope this analysis gives you adequate knowledge on how to melt copper and choose the accurate copper melting method depending on your requirements.